


How to Grow Hops?
Discover the secrets of how to grow hops with our comprehensive guide for beginners, covering planting, watering, pruning and more – perfect for home growers!
Are you curious about cultivating hops? You've come to the ideal spot. Hops, used to craft beer and providing a fulfilling experience for gardeners and hobbyists alike, can be grown with the right knowledge and effort.
In this guide, we'll provide a comprehensive overview of all the steps needed to grow hops successfully; from selecting an appropriate climate and planting rhizomes, to caring for your plants throughout the growing season and harvesting ripe cones. We'll also discuss vital aspects such as watering, fertilizing, pruning, training your hop vines (or bines), pest control methods, harvesting ripe cones efficiently, and storing your harvest for optimal quality.
By following our expert advice on how to grow hops effectively at home or even on a commercial scale if desired; you will soon be well-equipped with all the necessary knowledge required for cultivating these fascinating plants like a pro!
Table of Contents:
- Selecting the Right Climate
- Planting Hops
- Watering and Fertilizing
- Pruning and Training
- Pest Control
- Harvesting Hops
- Storing Hops
- Frequently Asked Questions How to Grow Hops?
- Conclusion
1. Selecting the Right Climate
Growing hops successfully starts with choosing the appropriate climate for these plants to thrive. Hops, which are used primarily in brewing beer and other beverages, grow best in regions with moderate temperatures and distinct seasons.
Temperature Range
Hops require a temperature span of 4-21°C (40-70°F) to flourish during the growing season. They can tolerate some frost but may suffer damage if exposed to prolonged freezing temperatures or extreme heat above 100°F (38°C).
Sunlight Requirements
These plants require ample sunlight - at least six hours of direct sun per day is ideal. This allows them to photosynthesize efficiently and produce healthy cones for harvest.
Ideal Growing Regions
- North America: In North America, hops flourish in the Pacific Northwest region, including Oregon, Washington State, and British Columbia due to its temperate climate and abundant rainfall.
- Europe: The famous Hallertau region in Germany is known for its high-quality hop production thanks to its mild summers and cool winters that provide optimal growing conditions.
- Oceania: New Zealand's South Island also boasts an excellent environment for hop cultivation due to similar climatic factors as those found in the Pacific Northwest of North America.
Even if you don't live in the areas mentioned, with careful tending and pest management, a good hop crop can still be produced. With proper care and attention paid towards watering schedules (source)and pest control methods (source), you can still achieve a successful hop harvest.
To ensure a successful harvest, it is imperative to choose an appropriate climate with suitable soil and temperature conditions for growing hops. With this in mind, planting hops correctly is essential for a successful harvest.
2. Planting Hops
Growing hops starts with proper planting techniques to ensure a strong foundation for your plants. Before you begin, it's essential to choose the right variety of hops suited for your climate and intended use. Choosing between the likes of Cascade, Centennial and Chinook hops can be a tricky task - all offering different aromas and tastes.
Soil Preparation
The first step in planting hops is preparing the soil. Soil for hop cultivation should be well-draining and have a pH in the range of 6.0 to 7.5 for optimal growth. To achieve this ideal environment, consider adding organic matter like compost or aged manure to improve drainage and nutrient content. Additionally, perform a soil test before planting to determine if any amendments are necessary.
Spacing
When designing your hop garden, ensure plants are spaced at least three feet (1 meter) apart within rows and eight feet (2 meters) between each row for optimal airflow. When planning your hop garden layout, allow at least three feet (1 meter) between each plant within rows while maintaining eight feet (2 meters) distance between rows themselves. This spacing ensures adequate airflow around the plants which helps prevent diseases from developing.
Depth of Planting
To plant hop rhizomes - small root cuttings that will develop into full-grown plants - dig holes about four inches deep (Azarius recommends using gloves when handling rhizomes due to their potential irritant properties). Place one rhizome per hole with its buds facing upward, then cover it with soil. Water the area thoroughly after planting to encourage root growth and establishment.
Support System
As hops are climbing plants, they require a sturdy support system to grow vertically. There are several options for hop trellises, such as using poles or stringing twine between posts. Whichever method you choose, ensure that your support structure is strong enough to hold the weight of mature hop vines laden with cones [source]. Providing proper support not only promotes healthy plant growth but also makes harvesting easier.
Sowing hops is an excellent way to kick off cultivating your own beer components. Now that you have the basics down, it's time to learn about watering and fertilizing your hop plants for optimal growth.
3. Watering and Fertilizing
Proper watering and fertilization are crucial to the growth of healthy hops plants. In this section, we will discuss the importance of proper watering and fertilization for optimal growth, including ideal schedules and types of fertilizer to use.
Watering Schedule
Hops require consistent moisture for optimal growth. It is essential to water your plants regularly but avoid overwatering as it can lead to root rot or other diseases. During the growing season, aim for about 1-1.5 inches (25-38 mm) of water per week through rainfall or irrigation systems like drip irrigation. If you live in a region with dry summers, consider increasing the frequency during hot spells.
- Young Plants: Water daily until they establish roots (about two weeks).
- Mature Plants: Reduce watering frequency gradually as they grow; typically every 2-4 days depending on weather conditions.
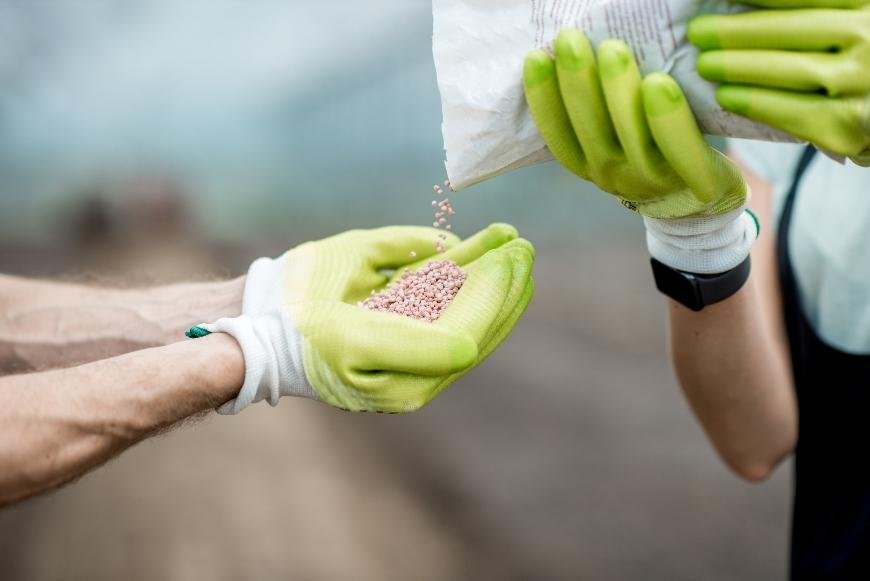
Fertilizing Hops Plants
Hops thrive when provided with adequate nutrients throughout their life cycle. Hops require nitrogen, phosphorus and potassium to be adequately nourished throughout their life cycle. A balanced N-P-K ratio ensures that your plant receives all necessary elements for vigorous growth and high-quality yields.
- Nitrogen: Promotes vegetative growth; apply at planting time and again during early summer months using a slow-release granular fertilizer or organic sources such as composted manure.
- Phosphorus: Supports root development and overall plant health; apply at planting time using a granular fertilizer or bone meal.
- Potassium: Enhances flower production, which leads to higher yields; apply during the flowering stage with potassium-rich fertilizers like sulfate of potash or wood ash.
In addition to these primary nutrients, hops plants also require micronutrients such as calcium, magnesium, and sulfur. These can be supplied through the use of balanced fertilizers or by incorporating organic matter into your soil.
Fertilizer Application Frequency
Fertilizer application rate varies depending on the kind of fertilizer employed and the development stage of your plant. Generally speaking:
- Granular Fertilizers: Apply every 4-6 weeks throughout the growing season according to package instructions.
- Liquid Fertilizers:Apply every 2-4 weeks during active growth stages for more precise nutrient delivery.
- Organic Amendments: Incorporate compost , aged manure , or other organic materials into your soil annually before planting . This will improve soil structure and provide slow - release nutrients over time .
Proper watering and fertilizing are essential for successful hop growth. Pruning and training will help you to further optimize the quality of your hops harvest.
4. Pruning and Training
Growing hops requires some attention to pruning and training in order to achieve optimal growth, yield, and overall plant health. This guide will assist you in the process of trimming and forming your hops plants to get the best yield and plant health.
Pruning Hops Shoots
In early spring, numerous shoots will emerge from the ground around your hop rhizomes or crowns. It's essential that you prune these back so that only 2-3 strong bines (hop vines) remain per plant. By doing this, you'll encourage better airflow around the base of each plant while also focusing energy on fewer bines for more vigorous growth.
- Select healthy bines: Choose 2-3 robust shoots with no signs of damage or disease.
- Cut away excess shoots: Using clean gardening shears, trim away all other shoots at ground level.
- Maintain throughout growing season: Continue monitoring your plants during their growth cycle and remove any additional unwanted shoots that may appear later on.
Hop Bine Training
To maximize hop production, it is important to provide support structures like trellises or poles for your hop bines to climb vertically. The ideal time for training is when they reach about 1 foot (30 cm) in length; this typically occurs between late April and early May depending on local climate conditions. Here are some tips on how to effectively train your hops:
- Create a support system: Set up trellises or poles that are at least 12-15 feet (3.7-4.6 meters) tall to accommodate the full height of mature hop bines.
- Select a clockwise direction: Hop bines naturally grow in a clockwise direction, so train them by gently wrapping each selected shoot around your support structure in this manner.
- Secure with twine if needed: If your hops need extra help staying attached to their supports, use soft garden twine to tie them loosely and avoid damaging the delicate plant tissue.
- Maintain throughout growing season: Continue monitoring growth and adjust as necessary; remove any side shoots below 4 feet (1.2 meters) from the ground for better airflow and pest control.
Pruning and training are essential steps in the process of growing hops, as it helps to maintain healthy growth and development. Pest management is a must when raising hops, as it can help ensure healthy growth and development.
5. Pest Control
Controlling pests is essential for maintaining a healthy hops garden and ensuring optimal growth. There are several common pests that can affect your hops plants, such as aphids, spider mites, and powdery mildew. To ensure optimal growth and health of your hops garden, we will explore methods to prevent common pests like aphids, spider mites, and powdery mildew.
Aphids
Aphids are small insects that feed on the sap of plants and can cause significant damage if left unchecked. To control aphids in your hops garden:
- Spray affected plants with a strong stream of water to dislodge the aphids.
- Introduce beneficial insects like ladybugs or lacewings into your garden; they prey on aphids naturally.
- If necessary, use insecticidal soap or neem oil as an organic treatment option.
Spider Mites
Spider mites, tiny arachnids related to spiders, can also wreak havoc on your hops by feeding on plant cells and causing leaves to yellow or die off completely. To prevent spider mite infestations:
- Maintain proper watering practices - overwatering creates ideal conditions for spider mite reproduction.
- Promote good air circulation around the plants by pruning excess foliage regularly.
- In case of severe infestation: - Use natural predators like predatory mites. - Apply organic miticides like neem oil or insecticidal soap.
Powdery Mildew
Powdery mildew is a fungal disease that appears as white, powdery spots on leaves and stems. It can stunt the growth of your hops plants if not addressed promptly. To prevent and treat powdery mildew:
- Ensure proper air circulation around your plants by pruning excess foliage regularly.
- Avoid overhead watering - water at the base of the plant to keep leaves dry.
- If necessary, apply a fungicide specifically designed for treating powdery mildew on hops plants.
Controlling pests is a must for attaining an abundant crop of hops. After putting in the effort to control pests, it is time to focus on harvesting your hops for maximum yield and quality.
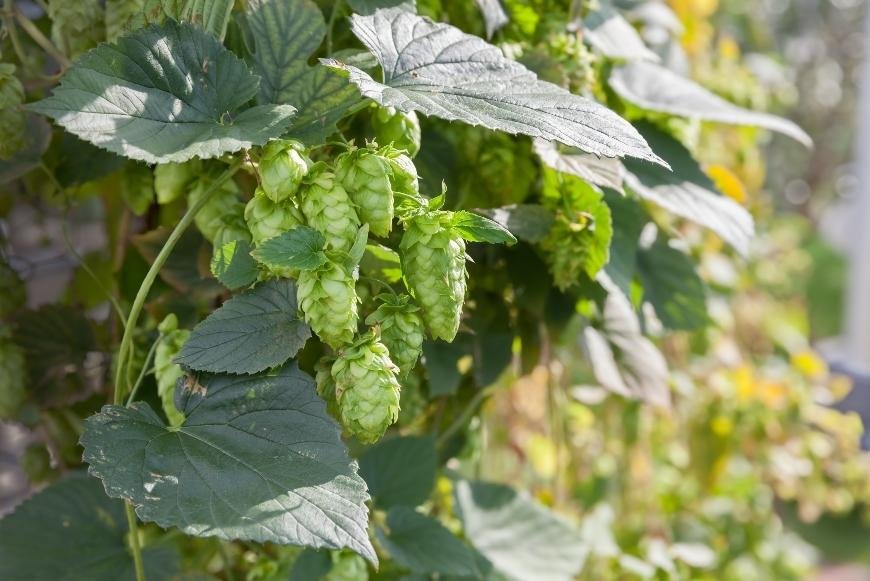
6. Harvesting Hops
Harvesting hops can be a gratifying experience, particularly when it is time to pluck these aromatic blossoms for utilization in making beer or other drinks. In this section, we will explore the ideal time to harvest your hops and how best to prepare them for storage or use.
When to Harvest
The ideal time for harvesting hops varies based on the variety of hop plant and local climate conditions. Generally speaking, most hop varieties are ready for harvesting between late August and early October. The key indicators that your hops are ripe include:
- A strong aroma emanating from the cones
- Papery texture of the cone petals when squeezed gently
- Slight browning at the tips of some cones
- Lupulin glands (the yellow powdery substance inside each cone) becoming more pronounced and sticky
To ensure you're harvesting at just the right moment, monitor your plants closely as they approach maturity. It's also helpful to consult with experienced growers or refer to resources like Homebrewers Association guide on harvesting hops .
How To Harvest Your Hops Properly
Once you've determined that it's time to pick those precious hop cones off their vines (also known as "bines"), follow these steps:
- Cut down entire bine carefully using sharp pruning shears.
- Lay out harvested bines on a clean surface such as a tarp or table.
- Gently pluck individual hop cones from bines, taking care not to crush them.
- Discard any damaged or discolored cones, as well as leaves and other debris.
It's important to handle your hops gently during the harvesting process, as rough handling can damage the delicate lupulin glands and diminish their aroma and flavor.
Drying Your Hops

To preserve their quality for brewing purposes, it's essential to dry your harvested hops before storing them. Drying helps reduce moisture content in the cones, which prevents mold growth and preserves their aromatic properties. There are several methods you can use:
- Air drying: Spread hop cones out on a screen or mesh surface in a cool, dark place with good air circulation for about 5-7 days.
- Oven drying: Place hop cones on a baking sheet lined with parchment paper in an oven set at its lowest temperature (around 140°F) with door slightly open for around 2-4 hours until they feel papery but not brittle.
- Food dehydrator: Arrange hop cones evenly across food dehydrator trays without overcrowding; follow manufacturer instructions regarding temperature settings and duration of drying time.
To ensure top-notch quality, harvesting hops requires meticulousness and precision. Moving on from harvesting, storing hops properly will help maintain their flavor and aroma for longer periods of time.
7. Storing Hops
Harvesting and preserving your own hops can be a fulfilling endeavor, particularly when it's time to store them for later use in brewing or other purposes. To ensure that your harvested hops maintain their freshness and potency, it's essential to follow proper storage techniques.
Vacuum Sealing & Freezing
- Vacuum sealing: Once your hops are thoroughly dried, vacuum seal them using an appropriate vacuum sealer device with oxygen barrier bags designed specifically for preserving foods like herbs and spices (source). This process removes excess air from the bag before sealing it shut which prevents oxidation that could degrade flavor compounds over time.
- Freezing: After vacuum sealing, place the sealed bags in a freezer for long-term storage. Freezing helps maintain hop freshness by slowing down any remaining enzymatic activity that could cause degradation of flavor and aroma compounds (source). Make sure to label each bag with the hop variety and harvest date for easy identification later on.
Storing Hops in Jars or Containers
Alternatively, opt for dark-colored glass jars or opaque plastic containers to protect your hops from light exposure and ensure they are labelled with the hop variety and harvest date. Choose dark-colored glass jars or opaque plastic containers to protect your hops from light exposure which can also degrade their quality over time (source). Just like with vacuum-sealed bags, make sure to label each container with relevant information such as hop variety and harvest date.
In summary, proper drying techniques combined with either vacuum sealing/freezing or using air-tight containers will help ensure that your homegrown hops remain fresh until you're ready to use them in brewing beer or other applications. By adhering to these techniques, you can extend the life of your hops for extended periods of time.
Frequently Asked Questions How to Grow Hops?
How many years does it take to grow hops?
It typically takes about 2-3 years for hop plants to reach full maturity and produce a substantial harvest. The first year is mainly focused on establishing the root system, while the second and third years see increased growth and production of cones.
What are the basics of growing hops?
The basics of growing hops include selecting an appropriate climate, planting rhizomes or cuttings in well-draining soil with ample sunlight, providing support structures for climbing vines, regular watering and fertilizing, pruning excess foliage, controlling pests, harvesting ripe cones at the right time, and proper storage after harvest.
How difficult is it to grow hops?
Growing hops can be moderately challenging due to their specific climate requirements and need for vertical space. However, with proper care including adequate water supply, nutrient-rich soil conditions (source) , pest control measures (source) , and timely harvesting techniques (source) , successful cultivation is achievable even by novice gardeners.
Conclusion
The key to successful growing of hops is proper care and attention. With the right climate, planting techniques, watering schedule, pruning methods and pest control measures in place you can be sure that your hop crop will thrive. Harvesting at the right time with careful storage techniques ensures maximum quality for whatever use you have planned for them. Grow hops? Yes. It's not as difficult as it may seem if done correctly – just remember all these steps along the way and enjoy a bountiful harvest.


