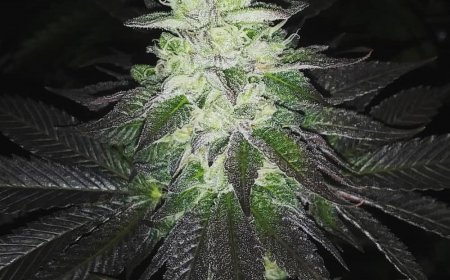
Outdoor cannabis cultivation - a comprehensive guide
The following guide was written for people living in the Netherlands, where you're allowed to grow up to 5 cannabis plants in your garden for personal use, provided you don't cause trouble to your neighbours (police can still take the plants away if they want to).
Many people don't like being dependent on dealers or cannabis dispensaries or are dissatisfied with the quality or variety that's offered there. To grow your own stash you do not necessarily need green fingers. With patience, enthusiasm and proper preparation, everyone can obtain a satisfactory harvest. Of course, contrary to indoor growing you'll be quite dependent on the weather, which means the quality and yield will differ from year to year.
Preparation
Taking into consideration the available space (size of the garden or balcony) it's a good idea to first decide whether you're going to grow in pots or directly in the soil.
By far the easiest way to grow outdoors is in open soil. Pick a spot that gets the maximum duration of sunlight, with a minimum of 5 hours of full exposure, but preferably more.
Growing in open soil has benefits but also some drawbacks.
Benefits of growing in open soil in comparison to growing in pots:
- The plants don't need to be watered by hand.
- Because of practically unlimited space for the roots, the plants can become extremely large, giving a larger yield.
But there are also drawbacks:
- The plant cannot be moved about, which can be a disadvantage if the weather is bad. Also in the case of disease or problems with the growing medium, treatment is more difficult.
- Plants in open soil tend to start flowering a bit later.
Not everyone prefers to grow in open soil or has the opportunity to do so. The pros and cons of growing in pots are as follows.
Benefits:
- Pots can be moved around. If the weather is bad or the neighbours start complaining, you can easily move the plants to a safe location.
- Plants in pots tend to flower a bit earlier and thus they can be harvested sooner.
- If there are problems with the growing medium, the plants can very easily be transferred to a pot with fresh soil.
Drawbacks:
- The plants will remain a bit smaller, relative to the size of the pots used.
- Plants in pots need more maintenance and must be watered by hand. This can be a disadvantage during holidays and on days when it's very hot.
- Plants in pots can be stolen more easily.
What's very important, regardless of whether you opt for growing in pots or open soil, is the medium in which your plants will grow. Cannabis prefers soil that's airy and slightly acidic (pH 6-7) and uses a lot of nitrogen and phosphorous, especially when flowering. In Dutch growshops, you can buy special soil mixtures, which are especially recommended if you're going to grow in pots. Regular garden soil or cheap soil for flowers tends to be too acidic and not airy enough. When growing in open soil it may be useful to enrich it with an organic fertilizer like blood and bone meal. Even better are chicken manure pellets, because that also contains some calcium. Make sure you use fertilizers sparingly because an excess can disturb the ecological balance (micro-organisms etc.) and burn the roots of the plants.
When growing in pots, a good soil mix will do, though it's useful to add liquid cannabis nutrition. Here too it's wise to use nutrition sparingly. Often half of what the manufacturer recommends is sufficient.
Seeds: choosing a strain
When you have decided to grow in pots or open soil, and have chosen a suitable location, you can start determining what would be the best strain for your purposes. There are hundreds if not thousands of strains available, and if we are to believe the suppliers, all of them are equally good! However, only a few strains are suited to our climate. It's advisable to select a strain that's suitable for outdoor growing because they tend to flower sooner than strains which are developed for indoor growing and more resistant to bad weather. Even if it's a weed, it's still a foreign plant that doesn't naturally grow here.
View the top 5 best outdoor strains, picked by our seed experts.
When you choose a strain, take note of the estimated flowering time (i.e. when the plant can be harvested). The later in the season the plant is ready, the shorter the days will be, and the increased chance of rainy and thus moist circumstances will also increase the risk of bud rot and fungi during the final stages of flowering. For this reason, Haze crosses and plants that are predominantly Sativa (originating in tropical areas) aren't always suitable for outdoor growing. These strains will flower up to 14 weeks (the average being 8) and will, therefore, be ready quite late in the fall.
With the seeds filter you'll find the strains that suit you best in a split second.
Germinating and growing
When you have obtained the right seeds, you can start germinating them. For outdoor growing, timing is essential! Normally sowing is done after Ice Saints (between May 11 and 15). After this period the chance of nightly frost is very small (though still possible in June). Of course, you can also start in April, either outside or inside, using simple artificial lighting. But be aware that your plants need a minimum of 18 hours of light, otherwise they might start flowering too soon. Also take note that if you start very early on in the season, your plants might become very big. Especially in open soil cannabis can grow into a plant of monstrous proportions, even up to 3,5 meters in height! Therefore don't be afraid to sow the seeds a little later. Even if you germinate the seeds in June or July, they will still have plenty of time to grow huge.
For the germinating itself there are various methods. To germinate, a seed needs moisture and warmth. A temperature between 24-28ºC (75-82ºF) is ideal. Note that this is way above normal room temperature. The easiest way is to let the seeds germinate in sowing soil. For this purpose you fill a small pot with soil and make it a little moist (for example using a plant sprayer). Place the seed about half a centimetre below the surface. Cover the pot with cling film or translucent plastic, and place it in an area that's sufficiently warm. Depending on the temperature and the seed you're using, germination will occur within 3 to 7 days. When you see the first leaves are above the ground, you can remove the plastic. The seedling now needs a lot of light, to prevent it from "stretching" and falling over. With sufficient light the seedling will remain compact, with its internodes close to each other, resulting in a stronger plant.
Azarius recommends using the Spongepot to germinate your seeds.
After 2 to 3 weeks you can move the plants to a bigger pot with fresh soil. This time uses the type of (mildly fertilized) soil we mentioned earlier. Be sure you move them to new pots in time, and try to avoid doing this too often. Immediately moving them into a large pot has many benefits: the roots immediately have enough space to stretch out and can make optimal use of the nutrients in the soil. If you use a good soil mix, you won't need to add nutrition for some time.
Don't give too much water in the first period, a common mistake of amateur growers! Cannabis doesn't like wet feet. It can stunt its growth and even result in root rot. Give moderate amounts of water every second or third day, and if the top layer is still very moist, wait with watering them again. As the plants get bigger, their need for water will increase. By lifting up the pot every now and then, you'll find out how much water is required.
Determining gender
Cannabis is a dioecious plant, which means it can produce male and female flowers. If a plant shows characteristics of both genders, it's called a hermaphrodite. Male plants produce pollen that will fertilize the female plants, which will then start producing seeds rather than sticky buds. Assuming you don't want that to happen, all male plants must be removed (destroyed) in time. We're then left with only the female plants, which produce the highest levels of THC in their flowers.
A male plant can be recognized by the tiny round sacks in which the pollen is produced. When they burst open, the pollen will be released, fertilizing the female plants that are standing nearby. A female plant can be recognized by the stamens, which look like tiny white hairs. The gender differences will be visible in the axils of the plant. This is the area between the stem and the petiole.
Flowering and pests
Depending on the strain your plant will start flowering between the end of July and the end of August. Plants in open soil tend to start flowering a bit sooner than those which grow in pots. Especially for the latter, it's recommended to start giving it a special flowering fertilizer.
Always keep an eye on the colour of the leaves, because it will indicate whether the plant is healthy or not.
Yellow leaves can have various causes. The growth medium might be too acidic so that the plant is unable to absorb certain nutrients. A pH level that's too low can also result in an exhaustion of the calcium buffer, which produces yellow leaves with brown spots on them.
Too much water can also colour the leaves yellow because then the roots don't get enough oxygen and 'suffocate'. This can again lead to root rot. If there is a lack of nutrients the older leaves will turn yellow first, from the inside out. If there is an excess of nutrients the tips of the leaves will become yellow (burnt), after which more leaves will die off.
One of the biggest threats to plants growing outside is the development of fungus or bud rot. After the third or fourth week of flowering the risk of bud rot becomes bigger and bigger because as the buds become thicker, air circulation between the stems and flowers becomes restricted. Especially in warm, moist and rainy weather with little wind this fungus (Botrytis cinerea) can spread itself very quickly. It's preferable that the plants are in a spot with lots of wind. However, stormy weather might also break some of the branches, or even blow over entire plants. In the flowering phase, regularly check the buds. If you spot fungus, remove the infected buds completely.
Aside from bud rot, problems may also arise from snails and other natural plagues. Snails can eat away a lot of leaves in a very short time, while their slime and droppings increase the risk of fungus. It may be useful to spread some (organic) slug pellets. A cheaper method is to combat the snails with beer. Dig some holes into the ground and place a few glasses of beer in them. The yeast in the beer attracts the snails, and once they've been caught in the 'trap', they won't be able to escape.
Generally, lice and other insects like thrips and spider mites don't pose a very big threat to plants growing outside, because there will also be natural enemies around that restore the natural balance. However, if their damage is significant, you might want to spray the plants with an organic bug repellent, preferably early in the morning while it's still dark, or in the evening. Don't spray after your plants have been flowering for more than 3 to 4 weeks.
Harvesting, drying and curing
After about 7 to 9 weeks of flowering, most outdoor strains will be ready to be harvested. A good way to determine whether the plants are ready for harvest is looking at the tiny glistening balls (trichomes) in the buds. When these start getting an amber colour the end of the flowering period is approaching. If you harvest when all the trichomes are milky/white, or half mily and half translucent, you'll get the highest levels of THC (giving a 'high' effect). Once half the trichomes are amber coloured, you'll get slightly less THC, but more CBD (good for relaxation and a 'stoned' effect). Once the trichomes are fully amber, the THC will start to degrade. It's difficult to distinguish the colour with the naked eye, so use a looking glass or a hand-held microscope.
Many growers harvest on the basis of the colour of the stamens. Harvest is commenced when many (80%) of the 'hairs' are brown. However, keep in mind that stamens may also turn brown due to moisture.
Once the buds are ripe, you can choose to first remove the leaves, cut the branches and hang them upside down, but you can also hang the entire plant upside down and do the cutting later. Some argue that when you remove the leaves later, the buds will taste better. Also if you don't have time to cut everything immediately, this is a practical solution. When cutting, remove all the larger leaves near the stem, and remove the tips of the smaller leaves near the buds.
You have to dry the plants with proper care because if you don't, the quality of your weed will be ruined.
If you decide to keep the buds attached to their branches, you can hang them upside down on rope suspended in the drying area. If you're going to detach the buds, you can lay them on a rack made with mosquito netting, or choose to buy a ready-to-use drying rack available in growshops.
The drying should take place in an area with a low humidity level. The temperature must not be too high, not too low either. A temperature between 17 and 21 degrees Celsius (63-70ºF) is ideal. Heat and light convert THC into CBD, CBN and other compounds, all of which determine the effect of your product. The drying takes about two weeks. If you can snap (rather than bend) the thicker branches, the buds are dry enough.
To keep your stash fresh for a long time, it's recommended to store it in airtight containers. preserving jars are especially suitable for this purpose. Store the jars in a dark, cool place. By keeping the buds in these pots and open them every now and then, the 'curing' will take place, a process in which chlorophyll is broken down, resulting in a golden brown colour and a mild, almost sweet taste.